Owning a handful of really good quality makeup is not everything for a flawless look. You need to arm yourself with good quality brushes and applicators too. In our Bridal Makeup Kit article, we shared all the necessary products for a bride-to-be. This article is dedicated to all the Tools and Makeup Brushes For Beginnersyou should have in your bridal makeup trousseau. Makeup brushes are available in various forms, shapes, and obviously sizes. Should you buy one for every kind? This thought always intrigues us as we look for good makeup tools. People often spend thousands on long-stay makeup items for their big day. However, very few realize the significance of having quality makeup brushes. Having a set of effective Makeup Brushes solves a lot of issues you may face while doing your own bridal makeup. Even if you aren’t doing your own bridal makeup, there still remains plenty of pre and post-wedding occasions when you have to use your own makeup skills to look awesome. Not just brides, this ultimate makeup tools list is going to help every makeup lover out there.
Table of Contents
Essential Tools & Makeup Brushes For Beginners
Face Makeup Brushes For Beginners:
1. Blending Sponge

Well, this is not a makeup brush per se. But I love blending sponges much more than any face brushes because you can do your entire face makeup with just this tool. You can apply moisturizer, primer, foundation, cream or liquid contour, strobe highlighters, cream blushes and even setting powders. Blending sponges give a seamless finish. Even a beginner can achieve a ‘second skin’ look with makeup sponges. You need to soak it n running water and squeeze the excess water. Always buy a beauty blender that feels soft to touch and enlarges significantly after soaking. These sponges are available in various shapes and sizes. Many celebrity makeup artists swear by basic wedge-shaped makeup sponges. Then there’s teardrop-shaped sponges (Beauty Blender Original or its dupes), Diamond, pinched teardrop blenders. You can even buy tiny sponge droplets for detailing work such as under-eye concealing or contour blending.
2. Tapered Fluffy Brush

If you want a single brush to work with all your powder products, you need a fluffy powder brush with a tapered tip. The size should be moderate; neither too big nor small. The brush should be soft and should glide through your skin without a scratchy feel. Just pinch the base of the brush and use the narrow tip for applying contour and blush. For full-face powder application or bronzing, you can use the brush in the usual way.
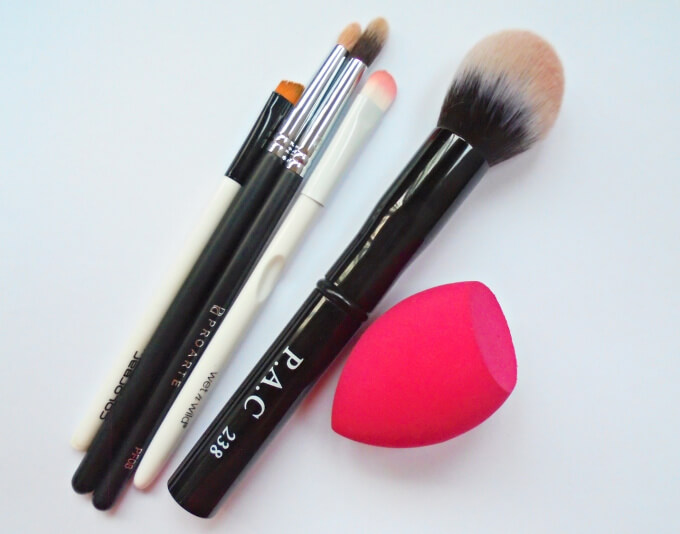
PAC Powder Brush 238: PAC has a collection of tapered face brushes. This one is a medium-sized duo-fibre brush. Bristles are very soft and it does not soak up much powder from your palette. It makes blending easy and quick.
3. Highlighter Brush
Highlighters contain glitter particles that don’t go off the brush completely without thorough washing. That’s why you can’t apply highlighters with the same brush you use for applying contour or setting powder. Highlighters need point specific application and detailing. Fan-shaped highlighter brushes or medium-size fluffy dome-shaped brushes are the best choices for powder highlighters. They pick the right amount of product and blend the glitters seamlessly.
Eye Makeup Brushes For Beginners:

1. Flat Eyeshadow Applicator Brush
Flat eye shadow brushes are meant for applying eye shadows to the eyelid. They come in different thickness and tip shape. Always buy a flat eye shadow brush depending on the lid space of your eyes. The more lid space you have, the larger your shader brush should be. Dense shader brushes with tapered ends can be used to apply powder eye pigments and glitters. Go for these ones instead of soft dual fibre ones.
Wet n Wild Small Eye Shadow Brush (E785): This one is an amazing buy from Wet n Wild. This is a synthetic fibre brush. Bristles are stiff and dense. This is a wider flat brush with a semicircle tapered tip. I use the tapered tip to lightly blend the harsh edges of the lid colour and then blend another time with a fluffy blender brush. I also use this to blend kajals while creating smokey eye looks. I like to dampen the bristles to get a better colour payoff from powder eye shadows.
2. Fluffy Crease Blending Brush
Blending comes after eye colour application. In this step, we create colour gradients by blending mid-tone colours with darker tones using blending brushes. Blending brushes are generally fluffy dome-shaped brushes. You’ll find duo-fibre, synthetic or animal hair brushes in this category. They are available in different sizes too. Choose a blending brush that has super soft bristles and a tapered head. Soft lighter fibres do not pick many colours but diffuse the colour evenly. The perfect blending brush for your eye size fits into your crease without effort. The ones that are smaller for your eye size might create streaks of colour near the crease. If you buy a larger one, your crease colour will be all over the lid.
Proarte Concealer Buffer Brush (PF08): Though this brush is meant for buffing cream concealers I find it to be the nicest blending brush for my eyes. This brush has a round tapered head. The bristles are extremely soft. I have washed it quite a number of times. Not a single bristle falls out from the base. PF08 softly diffuses the eye shadow on the crease. I have created intense smokey looks and gradient looks. In both cases the results were superb.
3. Pencil Brush
These are smaller dome-shaped brushes with fine pencil-like tapering on the tip. Pencil brushes are multipurpose. You can use this to define your outer V, to apply crease colour, to smudge the under eye or to apply a highlighter on the inner corner. You can also highlight the brow bone with it and create a smokey winged liner with a pencil brush. Go for synthetic fibre pencil brushes with moderate stiffness. You can easily get away with any size of pencil brushes. However, finer pencil brushes are best for monolid eyes. Never buy sponge tip pencil brushes. They degrade after 4-5 applications.
Pro Arte Smudging Smokey Liner Brush (PE29): Smudging Smokey Liner Brush from Proarte is a fine tip pencil brush. The fine tapering on the tip allows you to blend both gel and pencil kajal. You can also use it to clean up the edges of the cut crease. The bristles do not lose shape after washing. This one is a dupe for Sigma Pencil brush.
4. Slant Tip/ Angular Brush
When we enhance and shape eyebrow with tinted pencils, we need to clean up the edges of the brows using concealer. This step makes the brows look sharper. For this step, you’ll need a flat synthetic brush with an angular tip. Synthetic brushes are best for liquid or cream makeup items such as gel liner. You can also use an angular brush for brow pomades, under eye shadow application, gel liner application etc. Angular brushes come in different sizes. Pick something that is not very dense yet stiff.
Colorbar Angled Angel Eye Brush: This is the best synthetic brush with angled tip. The bristles have no fall outs even after washing 15-20 times. The quality remains the same as well. The bristles are moderately stiff. It spreads concealer with zero streak marks. It is a great brush for concealer cleanup. I also use it to do cut creases and to smoke up my winged liner.
* Spoolie Brow Brush (Optional)
I always start my eye makeup with eyebrows. For eyebrows, we need a spoolie brush. Most eyebrow pencils come with spoolie in one end. A dedicated spoolie brush is not at all needed.

Sreeparna Ganguly is a freelance content writer who is passionate about everything related to makeup, beauty, skincare, and online shopping. With more than 10 years of writing experience, she has contributed to various beauty blogs and has shared her immense knowledge with the beauty community.