Eyebrows are not just the deep-tinted hair that frames our eye contour. They are much more than that. Eyebrows are one of the major determining facial features of our face. Properly shaped brows make us look presentable instantly while poorly shaped brows steal the sharpness from the face. The fuller your brows are, the younger your overall face appears to be. Keeping our eyebrows in proper shape is a top priority among most of us. Girls who don’t even put a drop of makeup in their face, tend to flock around salons and parlors at least once a month to get their eyebrows done. It is not always possible to do a quick salon visit whenever a sudden event pops up and that’s the time we realize how important it is to be self-sufficient. In today’s post, I will take you through the simple steps I follow on how to shape eyebrows at home for the first time, especially if you are a beginner without anyone’s help.

Things You’ll Need to Shape Eyebrows at Home:

Tweezers
You’ll need a pair of good quality tweezers to get perfect brows. Eyebrow tweezers come in two categories; flat tip and slant tip. I use a basic slant-tip tweezer with a steel tip. Flat tip tweezers work equally well so choose what suits you. Just make sure the grip is firm so that it can pick up even the finest of your brow hair.
Wax Strip
This is another essential item for this DIY. We will use this to create and perfect the natural arch of the brows. We will also wax the unwanted hair on the forehead with this. Buy a good quality readymade wax kit. I am using Veet Wax Kit for Normal skin. Any brand wax strips do the job quite well but make sure the grip is firm enough to remove all the hair at once. Regular sugar or soluble waxes work pretty well but they need more skill than none of us amateurs possess.

Scissors
Keep a pair of small scissors handy. It will be used to trim the brows if needed and also to cut the wax strip into thin strips for use.
Talc
The t-zone of our face becomes oily easily and this oil makes the wax strip lose its strength easily. Oily hair often becomes hard to grab with tweezers. A little bit of any talcum powder can solve all these minor glitches. I am using Biotique’s Basil and Red Sandalwood Talc. You may use any talc but stay away from cooling talcs. They might irritate your sensitive facial skin.
Cotton
You will need a cotton round. Make 4-5 small pieces out of it. One piece will be used to cleanse the tip of the tweezer from time to time. It will also help in spreading the talc to the skin and clear the stray hair out of the way.
Eyebrow Pencil and Spooley Brush
A deep-tinted eyebrow pencil is a must and so is a Spooley brush. We will mark the brows with a pencil and Spooley will be used to comb the brows for a perfect shape.
Post Hair Removal Skin Soother
After hair removal, the delicate brow skin might get red and irritated. We have to apply something soothing to the skin to reduce the redness. I am using Biotique‘s Bio Chlorophyll gel which is a dedicated post-wax skin soother but plain aloe vera gel works equally well.

Step-by-Step Tutorial To Shape Eyebrows At Home
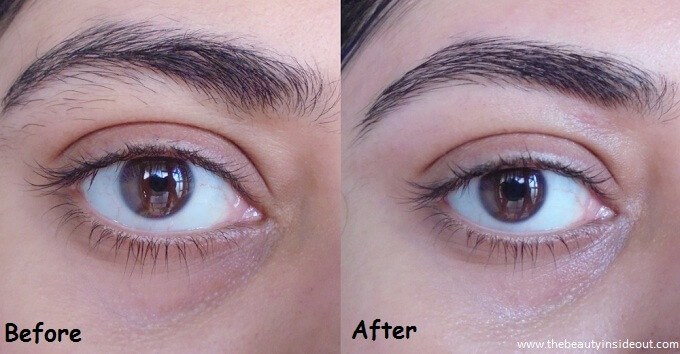
- To shape eyebrows at home for the first time, firstly we will draw a guideline around the brows with the brow pencil. Mark the beginning, end, and top position of the brow arch.
- Join the markings. For the top part, draw straight lines to join the beginning to the top point of the arch and the endpoint of the brows. Finally, draw a perfect curve at the bottom by tracing out your brow’s natural shape. Keep keen eyes while drawing. If both brows are not equally marked, the final result won’t look good.
- Take some talc in a cotton ball and spread it even outside the marking. Remove all hair on top of and outside of the boundary of your marking. In this step remove only the hair under the brows. The top part will be taken care of later.
- Remove the residue of powder and brow pencil marking with wet cotton. Check once again and perfect the lower curve of the brows. Now, take the wax strip and cut it into thin slices.
- Place the strips on each side of the brow arch to bring out the sharp angular shape of the brows. If you want to get a much rounder shape then remove the sharp tip with wax strips. Pull the strip in the opposite direction of hair growth. Wax the forehead and between the brows in the same way. Do not go near the hairline though.
- Cleanse the residue of wax from the skin with baby oil or oil paper provided in the wax kit. Wash the oil off with plain water and apply a drop of aloe vera gel or skin-soothing gel. The redness will subside in a few hours.
Step-by-Step Tutorial – Left Eyebrow (Pictorial)

Step-by-Step Tutorial – Right Eyebrow (Pictorial)

What not to do?
- Don’t apply wax strips in a particular place more than 1-2 times. The skin might get sensitive and can even bleed.
- Don’t go beyond the marked line. Otherwise, the brows will get thin.
- Don’t skin post hair removal soother or rashes might show up.
- Don’t apply makeup for at least 15-20 hours after doing your brows. The skin needs that much time to calm down.
Pocket-pinch:
Other than the tweezers and the wax strip, you will find all the other things there in your home. Eyebrow pencil with Spooley is a common makeup item in every makeup kit. You won’t even need to spend even a single buck for anything else. I bought the tweezer for around Rs.50-60 and it lasts forever. The 8 strip wax kit came for Rs.90-100. You can use it at least 15 times. This DIY has saved hundreds of my hard-earned bucks. If you are on a tight budget, this DIY is a must-try!
Other Benefits:
Salon beauticians often remove more than the required hair to get the perfectly arched shape. Though this gives an instant wow effect, this is not a good thing for your brows in the long run. You must have seen I have a few hair-less spots here and there. Still, I keep my brows as thick as possible. If you keep removing the hair year after year, sometimes the hair growth reduces and you are left with scanty brows. Doing your own brows prevent this mishap. Another thing is, this technique is less painful than threading. Here we are taking out 1-2 hair at a time while threading pulls out a bunch of hair in one go causing pain and redness.

Sreeparna Ganguly is a freelance content writer who is passionate about everything related to makeup, beauty, skincare, and online shopping. With more than 10 years of writing experience, she has contributed to various beauty blogs and has shared her immense knowledge with the beauty community.